Since Kali Linux 2016 came out (also known as Kali Rolling), it seems that Official VirtualBox guest addition doesn’t work well anymore. It also created lots of confusion and debate as when someone asks for help, they don’t always specify which version of Kali they are using and that leads to more issues. So, irrespective of all the debates and advises let me clearly say this: “In Kali Linux 2016.2, Official VirtualBox Guest Additions doesn’t work well”. Yes, you can install Official VirtualBox guest additions as released by Oracle VirtualBox, but it will create more issues.
VirtualBox Guest Additions in Kali Rolling / Kali Linux 2016.2 / Kali 2017
This posts tends to fix the following issues with VirtualBox Guest additions and other issues such as:
- Can’t make Kali Linux run in full screen on VirtualBox
- Can’t enable shared folder on Kali Linux running on VirtualBox.
- Shared clipboard not working on Kali Linux on VirtualBox.
- Kali Linux on VirtualBox is slow and not responding after installing Official VirtualBox guest Additions. It freezes!
- Mouse integration is not working on Kali Linux on VirtualBox.
- Kali Linux on VirtualBox doesn’t detect your display resolution properly.
- Screen doesn’t scale when I maximize or minimize VirtualBox window.
In short, this article will help you to successfully install the “Guest Addition” tools if you run Kali Linux as a “Guest” within VirtualBox. You must use version 4.2.xx or higher of VirtualBox in order to take advantage of the improvements, including compatibility updates, and enhanced stability of both the core application and the Guest Additions.
Correct way of installing VirtualBox Guest Additions in Kali Linux 2016.2/2017 (Kali Rolling)
The VirtualBox Guest Additions provide proper mouse and screen integration, as well as folder sharing, with your host operating system. To install them, proceed as follows.
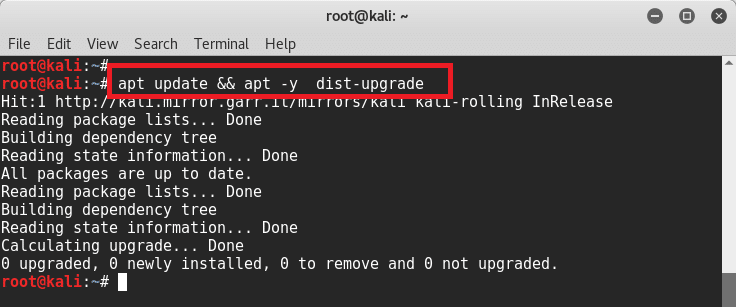
Step 1: Update & Upgrade and Dist-Upgrade
Start up your Kali Linux virtual machine, open a terminal window and issue the following commands.
root@kali:~# apt update & apt -y dist-upgrade
Once done, reboot your VirtualBox to ensure you’re booting into the new kernel/updates.
root@kali:~# reboot
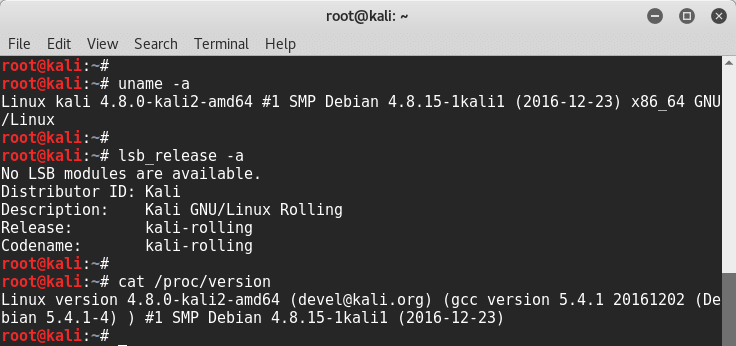
Step 2: Double-checking version
After reboot, I checked my version/lsb_release to ensure I am running the latest and greatest.
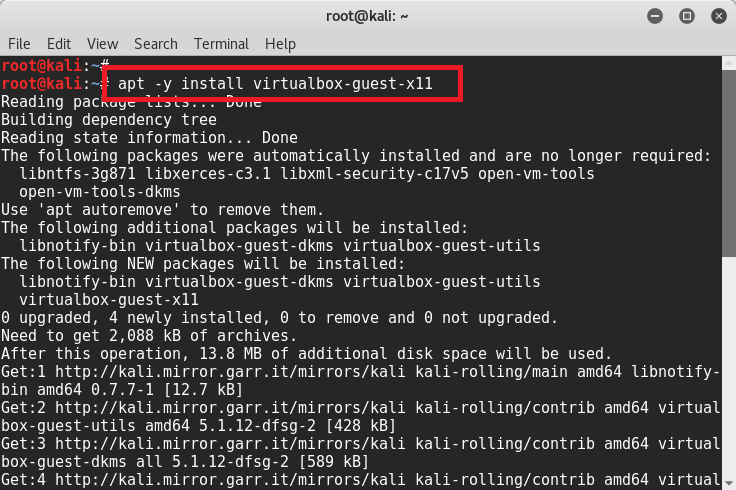
Step 3: Install VirtualBox Guest Addition
Since I am running the latest version and there’s no more update pending, I went in an installed virtualbox-guest-x11 tools. This virtualbox-guest-x11 package provides the X11 guest utilities for VirtualBox. These utilities are meant to be run inside the virtual machine. They provide closer integration and improve the interactive performance.
root@kali:~# apt -y install virtualbox-guest-x11
Again, when it’s finished, I rebooted my Virtual Guest.
root@kali:~# reboot
After reboot, my screen and shared drive worked including drag/drop and clipboard. Scroll down for step by step instructions on how to create Shared folders on VirtualBox.
[divider style=”solid” top=”20″ bottom=”20″]
Installing VirtualBox Guest Additions in Older Kali Versions
Following are the exact steps you need to follow to install VirtualBox guest additions packages on Kali Linux and fix these issue.
Step 1: Install dependencies
One thing to note is that you need to have the correct repositories added before any of these would work. Once you’ve added the correct and official repositories, just update your package manager.
root@kali:~# apt-get update && apt-get upgrade -y && apt-get dist-upgrade -y
It’s better off doing update, upgrade and dist-upgrade before installing headers because if you’ve installed an older Kali Linux version, correct Linux headers might not be available in the repo anymore.
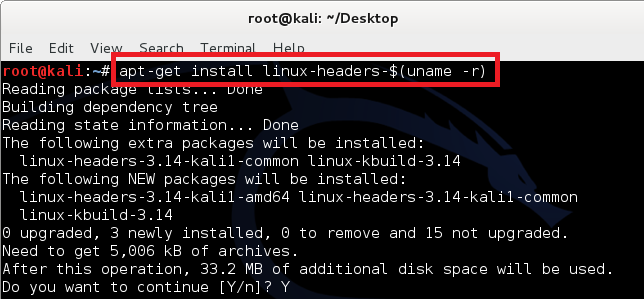
Install all the dependencies by running the following command:
root@kali:~# apt-get install linux-headers-$(uname -r) -y
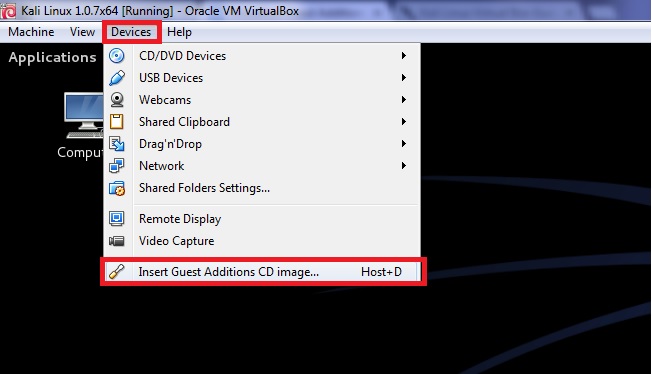
Step 2: Mount VirtualBox Guest Additions drive
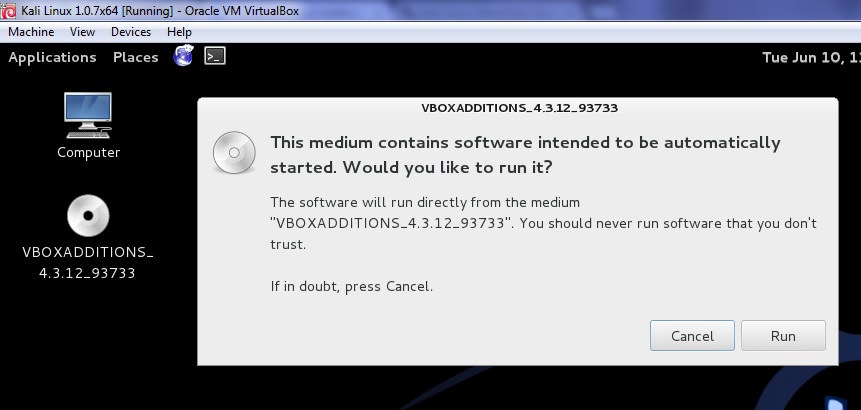
From device menu on your VirtualBox, click on Install VirtualBox guest additions option (while you’re running Kali Linux) and you’ll see a CD/DVD drive is mounted.
Step 3: Copy and install the package
Copy the VBoxLinuxAdditions.run file from the drive to the root directory using following command
root@kali:~# cp /media/cdrom/VBoxLinuxAdditions.run /root/Desktop/
root@kali:~# cd /root/Desktop/
Make it executable:
root@kali:~/Desktop# chmod 755 VBoxLinuxAdditions.run
Install it:
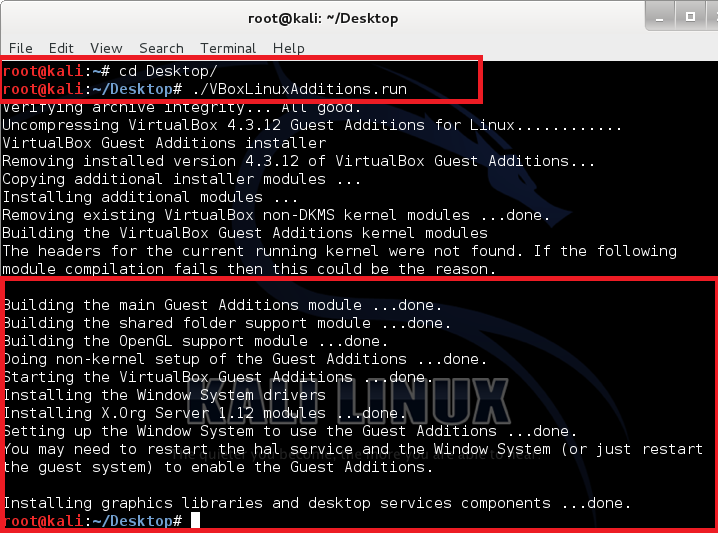
root@kali:~/Desktop#./VBoxLinuxAdditions.run
Once you’ve installed VirtualBox Guest Additions package, reboot Kali Linux.
root@kali:~/Desktop# reboot
In the screenshot above, note all the …done. messages. When you see these, you know it was a successful installation.
Now you will have Kali Linux running on full screen on your VirtualBox.
[divider style=”solid” top=”20″ bottom=”20″]
Creating Shared Folders with the Host System
This section explains how to share folders on your host system with your Kali Linux VirtualBox “guest”. In order to share folders on your host system with your Kali Linux VirtualBox, there are a few short steps that needs to be completed.
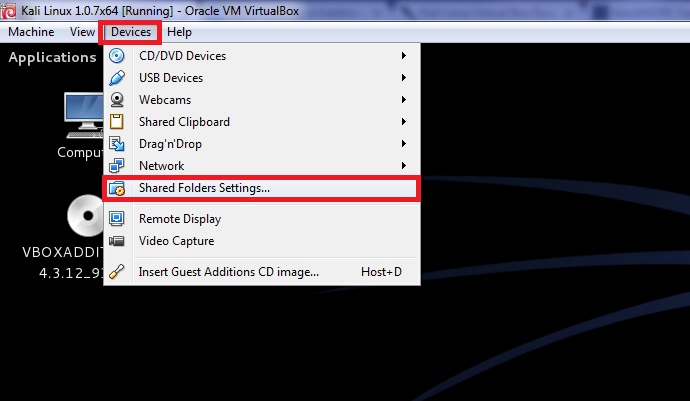
Step 1: Add a folder/drive to Shared Folder Settings
From the VirtualBox Manager, select your Kali Linux VirtualBox instance and click on the ‘Shared Folders Settings’ link in the right window pane. This will launch a pop up window for adding shared folders. Within this window click the icon to add a folder.
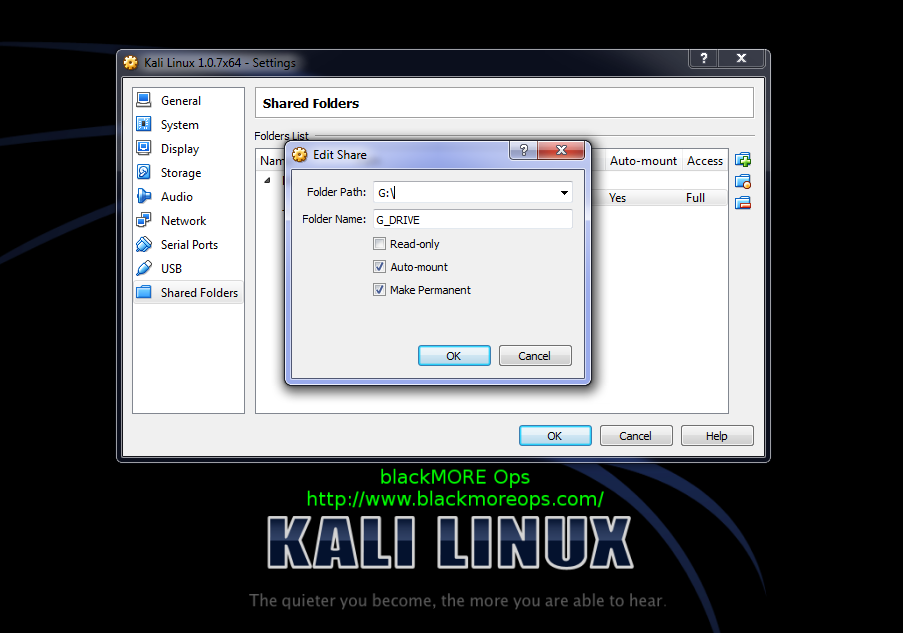
Step 2: Auto-mount and Make permanent your shared folder
In the Folder Path text box, provide the path to the folder you would like to share, or click the drop-down arrow to browse your host system for the path. Select the check boxes that allow for ‘Auto-mount’ and ‘Make Permanent’ and click the OK button both times when prompted.
Your shared folders will now be available in the media directory. You can create a bookmark or link for easier access to the directory.
Conclusion
An obvious debate to this post would be: “Why not use the official VirtualBox Guest additions?” The answer is simple, it works but not well enough and the random freezing makes your machine almost impossible to use. So we’ve decided to stick to the Open Source VirtualBox Guest Additions. Why use something that’s broken!
Thanks for reading. If you’ve found it useful, please share. Comment if you need help or discuss options.






I have kali 4.6.0-kali1-amd64 #1 SMP Debian 4.6.4-1Kali1 (2016-07-21) x86_64 GNU/Linux version
And when i write
apt-get install linux-headers-$(uname -r) -y
It says- unable to locate package Linux-headers-4.6.0-kali1-amd64
and then i follow next step and run the VBoxLinuxAuddituon.run and this runs successfully
But when i rebooted full screen not showing what i should do….
Please help thanks
my kali 4.6.0 too,
try this it’s worked for me
HEllo,
I have followed the balckmoreops tutorial to install kali and it worked perfectly.
But when I try to install the VirtualBox Guest Additions, I get a black screen when I am trying step 1.
any clue ?
If you have already installed VirtualBox Guest Additions using the Official version..does it need to be uninstalled before installing the Open Source version…if so..how is that accomplished?
It Works, thank you so much. It didn’t work from official website instructions but worked from instructions from here.
Everything worked perfectly as per yer Instruction. A huge help, thanks!
Hi I followed your steps and still my shared clipboard and drag and drop options wont work. I am using a mac.
Hello,
I succesfully installed Guest additions for Kali Linux from Vbox site. Shred clipboard works for me, but not Drag and Drop. My host OS is Linux Mint 17.
Does your vbox additions allows drag and drop from host to kali and viceversa? or not?
Followed all the steps with no more upates pending.. but when i try to apt -y install VB GuestAditions it says it cant be found???
Hi. after the dist-upgrade part, I get the error,
intel_raple: nio valid rapl domains found in package 0.
the error is :
intel_rapl_: no valid rapl domains found in package 0
THANK YOU!! <3
Excellent Tutorial Works Like a Charm
Very helpful worked for me thanks for sharing this
I have followed this tutorial and so many others. Did everything as described here. I just end up at the same error after running VBoxLinuxAdditions.run :
Failed to setup service vboxadd…
VBoxGuestAdditions.log says to look at vboxadd-install.log
vboxadd-install.log shows the same error every time:
/tmp/vbox.0/Makefile.include.header:112 ERROR unable to find the source for your current linux kernel. Specify KENR_DIR= and run make again
Can you help?
thanks it works for me!!!
gracias!!1
I kept using the official guest addition from the Device menu following tons of suggestions from all over the internet. Nothing works…
But after 3 days of trying i use this “virtualbox-guest-x11” to install. AND IT WORKS….!!!!!
thanks…
A charm can not decribe how precise is this tutorial, Thank very much dude you brought me back from hell…ahaha thanks. It works for me, thanks
I followed you from a-z and I have the latest version but I still don’t understand why it didn’t work for me
root@kali:~# uname -a
Linux kali 4.14.0-kali-amd64 #1 SNP Debian 4.14.17-1kali (2018-02-16) x86_64 GNU/Linux
root@kali:~# lab_release -a
No LSB modules are available.
Descributor ID kali
Description : kali GNU/Linux Rolling
Release: kali-Rolling
Codename: kali Rolling
root@kali:~# Cat /process/Version
Linux version 4.14.0-kali-amd64 ([email protected]) (GCC version 7.3.0 (Debain 7.3.0-3)) #1 SMP Debian 4.14.17-kali (2018-02-16
This post is a blessing to a noob. Thanks alot.