 blackMORE Ops Learn one trick a day ….
If you’re looking to set up a powerful, flexible network-attached storage (NAS) system for your home media server or small business, Unraid is a brilliant choice. This comprehensive guide will walk you through the entire Unraid installation process from start to finish, with all the tips and tricks for a successful setup in 2025.
Unraid has become one of the most popular NAS operating systems for DIY enthusiasts and professionals alike, offering unmatched flexibility for data storage, media streaming, virtualisation, and Docker applications. Unlike traditional RAID systems or pre-built NAS solutions from Synology or QNAP, Unraid gives you complete control over your hardware while maintaining simplicity in management.
Whether you’re building your first home server to store family photos and host a Plex media server, or setting up a robust small business backup solution, this step-by-step Unraid tutorial covers everything from initial hardware selection to advanced configuration options. By the end of this guide, you’ll have a fully functional Unraid server ready to store, protect, and serve your valuable data.
What You’ll Need for Unraid Installation
- A computer with at least 2GB RAM, 64-bit CPU, and a USB drive (at least 1GB)
- A USB flash drive (minimum 1GB) for the Unraid OS
- One or more hard drives for storage
- Internet connection for downloading Unraid and activating your licence
- A separate computer to create the Unraid USB and access the web interface
For example, I use HPE Microserver that has been running for 5 years straight.
Step 1: Purchase an Unraid Licence
Before starting, visit Unraid’s website to purchase a licence. Unraid offers three licence tiers based on the number of drives you plan to use:
- Basic: Up to 6 drives
- Plus: Up to 12 drives
- Pro: Unlimited drives
You can start with a 30-day free trial if you’re not ready to commit.
Step 2: Create Your Unraid USB Drive
- On a separate computer, download the latest Unraid OS from the official website
- Download and install the “Unraid USB Creator” tool
- Insert your USB flash drive
- Open the USB Creator tool and select your USB drive
- Choose the downloaded Unraid OS file
- Click “Write” to create your bootable Unraid USB
Step 3: Install Hard Drives and Connect Hardware
- Power off your server
- Install all your hard drives
- Ensure your network cable is connected
- Insert the Unraid USB drive you created
- Connect a monitor and keyboard (only needed for initial setup)
Step 4: Boot into Unraid
- Power on your server
- Enter your BIOS/UEFI settings and set the USB drive as the first boot device
- Save and exit BIOS, allowing the system to boot from the USB
- Unraid will boot up and display the IP address of your server on the screen
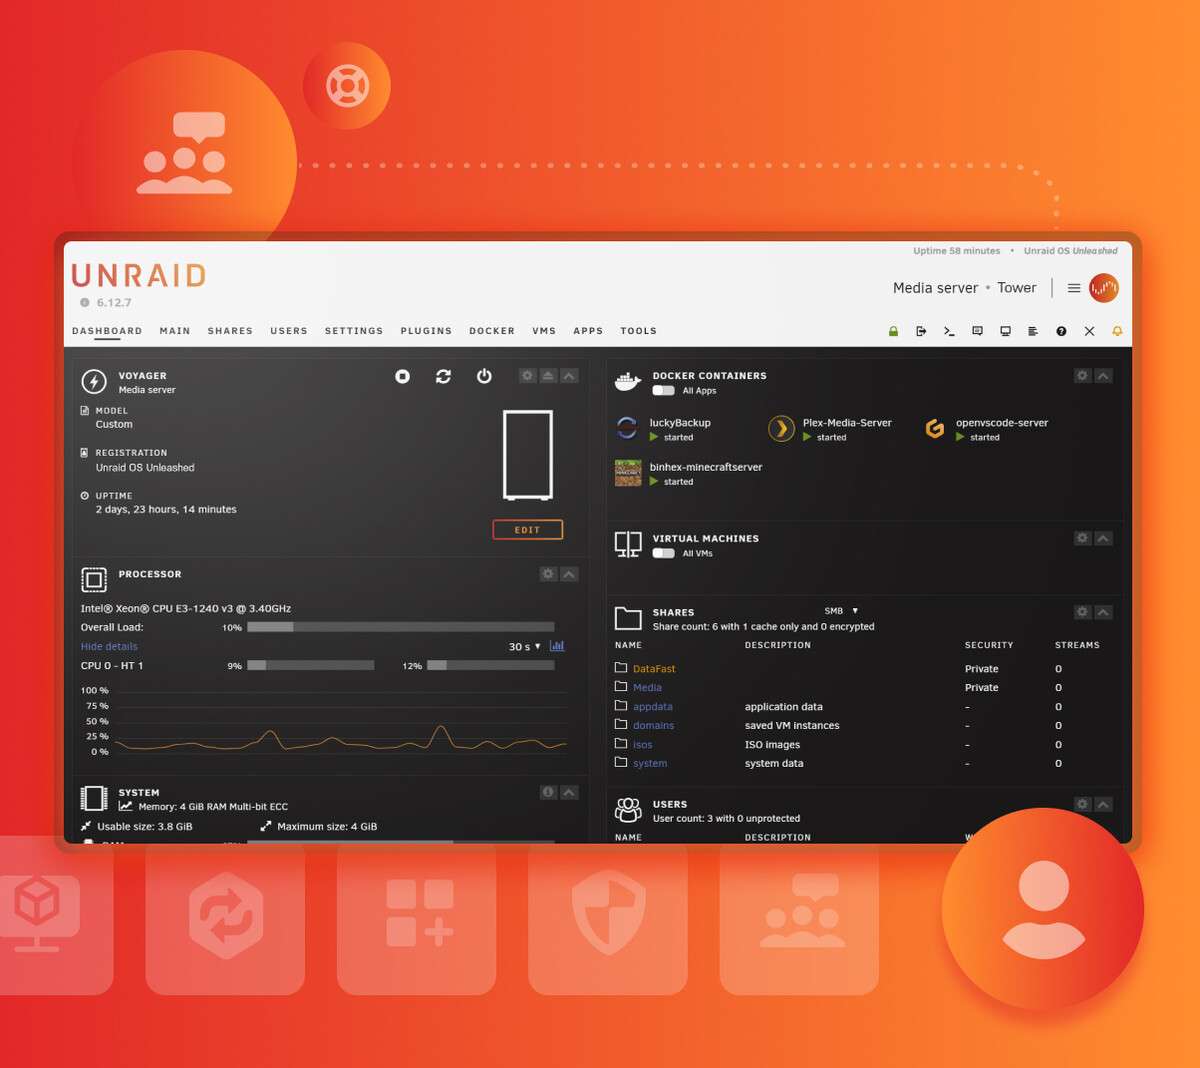
Step 5: Access the Web Interface and Initial Setup
- From another computer on the same network, open a web browser
- Enter the IP address shown on your Unraid server’s screen
- You’ll be greeted with the Unraid webGUI
- Set a root password when prompted
- Register your server with your licence key or select “Trial” mode
Step 6: Configure Your Drives
- Go to the “Main” tab in the Unraid interface
- Assign one drive as your “parity” drive (this should be your largest drive)
- Assign your other drives as “Array” drives
- Click “Format” for each drive when prompted
Step 7: Start the Array
- Once drives are configured, click “Start” to initialise the array
- The first start will take some time as Unraid performs a parity sync
- Wait for this process to complete before adding any data
Step 8: Create Shares
- Go to the “Shares” tab
- Click “Add Share”
- Name your share and configure access permissions
- Repeat for any additional folders you want to create
Step 9: Install Docker and Community Applications (Optional)
- Go to the “Plugins” tab
- Click “Install Plugin”
- Enter https://raw.githubusercontent.com/Squidly271/community.applications/master/plugins/community.applications.plg for the Community Applications plugin
- After installation, a new “Apps” tab will appear
- Use this to install popular applications like Plex Media Server, NextCloud, etc.
Step 10: Configure Backups and Maintenance (Recommended)
- Set up scheduled parity checks under “Settings” > “Scheduler”
- Configure notifications via email or other methods
- Consider setting up external backups for critical data
Troubleshooting Common Unraid Installation Problems
- Server not appearing on network: Check your network cable and router settings
- Drive errors: Check the system logs under the “Main” tab
- Parity sync failures: Ensure your parity drive is at least as large as your largest data drive
- Slow performance: Consider enabling cache drives or adjusting your network settings
- Docker container issues: Check container logs and ensure you’ve allocated sufficient resources
For more complex issues, visit the Unraid forums or r/unraid subreddit for community support.
Why Choose Unraid Over Other NAS Solutions?
Unraid offers several advantages over traditional RAID setups and other NAS solutions:
- Mix and match drive sizes: Unlike traditional RAID, Unraid allows you to use drives of different capacities
- Data protection without duplication: Parity protection requires less overhead than mirroring
- Easy expansion: Add more drives to your array without rebuilding
- Versatility: Run virtual machines, Docker containers, and traditional file sharing from one system
- Active community: Extensive plugin ecosystem and helpful user forums
Final Thoughts
You now have a fully functioning Unraid NAS server. Take some time to explore the interface and additional features like VM support, Docker containers, and plugins that can expand your server’s capabilities.
Remember that Unraid runs entirely from the USB drive, so keep it safe and consider making a backup of it once everything is configured to your liking.
With regular maintenance and proper setup, your Unraid server can provide years of reliable storage, media streaming, and application hosting services for your home or small business network.
Frequently Asked Questions About Unraid Installation
How much does Unraid cost?
Unraid starts at $59 for the Basic licence (up to 6 drives), $89 for Plus (up to 12 drives), and $129 for Pro (unlimited drives).
Can I upgrade my Unraid licence later?
Yes, you can upgrade your licence by paying the difference between tiers.
What happens if my USB drive fails?
Always keep a backup of your USB drive. If it fails, you can easily recreate it using the same licence key.
Can I run Plex Media Server on Unraid?
Absolutely! Plex runs excellently on Unraid as a Docker container.
Does Unraid support hardware transcoding?
Yes, with appropriate hardware and configuration, Unraid supports GPU passthrough for hardware transcoding.
Can I access my Unraid server remotely?
Yes, through VPN, remote desktop solutions, or Unraid’s built-in remote access features.
How many drives can Unraid support?
Theoretically, as many as your hardware can handle. The Pro licence supports unlimited drives.
Setting Up Private Internet Access VPN on Unraid
Securing your Unraid server with a VPN like Private Internet Access (PIA) is essential for protecting your data and maintaining privacy, especially when accessing your server remotely. Here’s how to configure PIA on your Unraid system:

Method 1: Using the PIA Docker Container
- Install the Docker Engine if you haven’t already (covered in Step 9 above)
- Access the Community Applications plugin from the “Apps” tab
- Search for “Private Internet Access” or “PIA VPN” in the search bar
- Install the “binhex-privoxyvpn” or “binhex-delugevpn” container (both include PIA support)
- Configure the container with your PIA credentials:
- Enter your PIA username and password
- Select your preferred PIA server location
- Configure the VPN port (typically 1198 for UDP or 502 for TCP)
- Set the kill switch option to prevent leaks
- Start the container and check the logs to confirm successful connection
Method 2: Using OpenVPN Configuration
- Download PIA OpenVPN configuration files from the PIA website
- Upload the .ovpn files to your Unraid server (via SMB share or SSH)
- Install the “OpenVPN” plugin from the Community Applications
- Configure OpenVPN with your PIA credentials and the uploaded configuration files
- Enable the VPN connection from the Unraid dashboard
- Test the connection by checking your IP address from the server
Configuring Split Tunneling for Specific Applications
To route only certain applications (like a torrent client) through your PIA VPN:
- Create a custom Docker network for VPN traffic
- Configure the PIA container to use this network
- Add your desired applications to the same network
- Configure networking rules in the Unraid interface to ensure proper routing
Troubleshooting PIA VPN Connection Issues
- Connection drops: Check your Unraid server’s internet connection and PIA server status
- Speed issues: Try different PIA server locations or switch between UDP/TCP protocols
- DNS leaks: Enable the “Use VPN DNS” option in your PIA container settings
- Container access problems: Configure proper port forwarding in the PIA container settings
For optimal performance and security, consider setting up automated health checks to restart the VPN connection if it drops, and configure your firewall rules to prevent any unprotected traffic from leaving your server. Additional guide on PIA can be found here.